Hardness Testing Basics
 Hardness’s a characteristic of a material instead of fundamental physical property. It’s defined as indentation resistant, and it’s determined by conducting measurements to the permanent depth of the indentation. In other words, when utilizing a fixed force (load)* and a given indenter, the harder the material if the indentation is smaller. Indentation hardness values gained by measuring the area or depth of the indentation using one of over 12 different test methods.
Hardness Testing Considerations
The following sample characteristics should be considered before choosing the hardness testing method to make use of:
- Sample Size
- Cylindrical Samples
- Sample Thickness
- Scales
- Gage R&R
Sample Size
The smaller the part, the lighter the load required to produce the required indentation. On small parts, it is particularly important to be sure to meet minimum thickness requirements and correctly space indentations away from the inside, especially outside edges. Larger parts require to properly be fixtured to guarantee secure placement throughout the process of testing with no chance for slippage or movement. Parts that overhang the anvil or are not easily supported on the anvil are supposed to either be properly supported or clamped into place.
Cylindrical Samples
A correction to a test result is needed when it comes to testing on cylinder shapes using small diameters because of a difference between radial and axial material flow. Correction of Roundness factors are added to your testing result on the basis of the diameter of convex cylinder surfaces. Furthermore, it’s important that a minimum spacing which equals to 2~1/2 times the diameter of the indentation from an edge or another indentation is maintained.
Sample Thickness
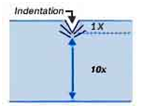
Your sample should have a minimum thickness that is at least 10 times the indentation depth that’s expected to be gained. There are minimum, acceptable thickness recommendations for superficial and regular Rockwell methods
Scales
Sometimes, it’s needed to test on 1 scale and report on another scale. Conversions have been established that contain some validity, but it’s important to note that unless a real correlation has been done by testing on various scales, conversions that are established may or may not deliver reliable information. (For non-austenitic metals in the low hardness range and high hardness range, look through the ASTM scale conversion charts). And For more scale conversion information, refer to ASTM standard E140.
Gage R&R
Gage Repeatability and Reproducibility Studies were developed to calculate the ability of operators and their instruments to accordingly test within the tolerances of a test piece that’s given. In hardness testing, there are variables that are inherent which hinder from utilizing the standard Gage R&R formulas and procedures with actual test pieces. Variation of materials and the incapability to retest the depth measuring testers’ same area are 2 important factors that affect the results of GR&R.To minimize these effects, it’s best to do the study on highly consistent test blocks to minimize these variations that are built-in.
Newage Testing Instruments hardness testers function is suited perfectly for these types of studies. Regrettably, because these studies can be done effectively only on test blocks, their value doesn’t essentially translate into genuine testing operations. There are a host of factors that can be introduced when testing under real conditions. Some Newage testers excel at testing in real conditions by minimizing the results of operator influence, vibration, part deflection because of scale, dirt, and a specimen flexing under load.
Source by: Ametek

